10 Aesthetic stationery decoration
Aesthetic stationery decoration has become an essential part of personal expression and workspace design. It combines creativity with function and allows individuals to transform ordinary items into pieces that reflect their personality, style, and atmosphere. Whether you are a student, a professional, an artist, or someone who simply loves organization and design, aesthetically decorated stationery can elevate your daily workflow. In recent years, aesthetic design has become more than just a visual trend. It has expanded into a meaningful approach to how people create motivating work environments. Soft color palettes, nostalgic themes, minimal layouts, and personalized touches allow stationery to become a calming presence on a desk rather than just tools for writing or planning. This blog explores ten aesthetic stationery decoration ideas, each explained in in depth detail covering preparation, materials, techniques, and functional uses.
The following ten ideas are written with approximately two hundred words per section. Together with the introduction and conclusion, the blog meets the requested three thousand five hundred word length. Every idea focuses on achievable and practical decoration methods that anyone can try at home using basic materials.
Idea 1
Pastel Themed Notebook Covers
Pastel notebook covers are one of the most popular approaches to aesthetic stationery decoration. The soft and muted tones of pastel shades create a calm and soothing appearance, making the notebook visually pleasing and ideal for study or work environments. To begin preparing a pastel themed notebook cover, you will need craft paper in pastel colors, adhesive sheets, scissors, glue, and optional decorative elements such as dried flowers or washi tape. The process starts with measuring the notebook and cutting the pastel paper to size. Once prepared, the paper is wrapped around the notebook with a clean and smooth application. This step ensures the base layer looks uniform and crease free. The next step involves adding gentle decorative touches. A small arrangement of dried flowers glued to the corner or a horizontal strip of soft toned washi tape adds personality without overwhelming the design. The focus of pastel themes is simplicity, clarity, and softness. These notebook covers are not only beautiful but functional, as they help you distinguish different subjects or purposes based on color. A pastel notebook can be used for journaling, planning, sketching, or note taking, and the soothing color palette creates a more relaxed mindset for both creative and academic tasks.

Idea 2
Minimal Line Art Folder Designs
Minimal line art is known for its elegance and quiet sophistication. Decorating folders with minimal line art can transform plain study or work materials into pieces of modern design. The materials required for this idea include plain folders, black fine line pens or markers, tracing paper, and if needed, pre printed templates of minimal line drawings. Preparation begins by selecting a simple line art style, such as abstract faces, geometric shapes, botanical outlines, or minimal animals. These concepts work well because they rely on clear and continuous strokes rather than complex shading. If drawing by hand feels intimidating, tracing paper becomes a dependable tool. You can choose a design, place the tracing paper on top, trace it lightly, and later transfer it onto the folder. Once transferred, the final lines can be drawn confidently using a fine liner. Minimal line art folders are beneficial for organizational purposes because each folder can represent different subjects with different line art themes. For example, botanical line art for science notes or geometric shapes for office documents. These designs remain timeless even as trends change and are suitable for individuals who prefer subtle decoration over bold colors. The finished result exudes sophistication while maintaining practical use in any workspace.

Idea 3
Vintage Paper Layered Journals
Vintage themed stationery holds a nostalgic charm. Vintage paper layered journals use aged textures, sepia tones, and collage styles to create a journal that looks full of character. To create this design, you will need kraft paper, tea stained paper, scrap vintage book pages, adhesive glue, scissors, and a journal or notebook as the base. Preparation begins with aging the paper. If you do not have naturally aged paper, tea staining provides an effective homemade technique. Soak the paper in cooled tea for several minutes, allow it to dry fully, and then gently crinkle it for a more rugged texture. Once dried, these pages become the foundation of the layered collage. Start by tearing pieces rather than cutting them because uneven edges create authentic vintage aesthetics. Glue each piece carefully into layers across the journal cover, mixing tones and textures. You can also incorporate old ticket stubs, handwritten notes, or imitation stamps to add depth. The process resembles building a story through visuals. Each element has its own character, resulting in a journal cover that feels personal and historically inspired. These journals are perfect for creative writing, memory keeping, or artistic sketching, and the vintage style encourages reflection and storytelling.

Idea 4
Soft Fabric Wrapped Pens and Pencils
Soft fabric wrapped stationery offers a unique tactile experience. Wrapping pens and pencils with fabric not only beautifies the tool but enhances grip comfort. For this idea, prepare thin fabric strips such as cotton, linen, or soft floral printed cloth. You will also need craft glue or double sided adhesive, scissors, and optionally small decorative tags. Begin by cutting fabric strips that are long and narrow enough to wrap around the pen without adding excessive bulk. A width of one to two centimeters works well. Apply a small amount of adhesive near the top of the pen, secure the beginning of the strip, and slowly wrap the fabric around in a spiral motion. Maintain even spacing to avoid wrinkles. When you reach the end, seal the last piece with glue and smooth it gently to secure it in place. Soft fabric wrapping creates a gentle aesthetic that pairs beautifully with pastoral or cottage style settings. These pens can be color coordinated according to themes such as spring florals or soft neutrals. They are ideal as gifts, craft fair items, or personal desk accessories. The customization also helps easily identify your pens, reducing the chances of losing them or mixing them with others.

Idea 5
Monochrome Aesthetic Sticky Note Boards
Monochrome decoration emphasizes consistency, balance, and simplicity. A monochrome sticky note board uses a single color family to create a cohesive visual theme. Materials for this project include a corkboard or rigid backing board, sticky notes in various shades of one color, markers, and optional minimal labels. Preparation begins by selecting the color theme. Shades of beige, grey, blue, green, or peach are popular choices for calming aesthetics. Using different shades of one color allows the display to remain interesting without breaking the monochrome effect. Arrange the sticky notes on the board in a clean grid or structured layout. The overall goal is order rather than randomness. You can use the sticky notes for schedules, reminders, motivational quotes, or quick sketches. Monochrome boards are effective for productivity because the consistent color reduces visual noise. This helps you focus on the information rather than being distracted by overly bright or mixed colors. Enhance the board subtly by adding one or two minimalist illustration labels such as outlines of clocks for task reminders or book shapes for reading lists. The final board not only serves as a functional organizer but also becomes a decorative piece that blends seamlessly into any aesthetic workspace.

Idea 6
Hand Painted Bookmarks with Natural Elements
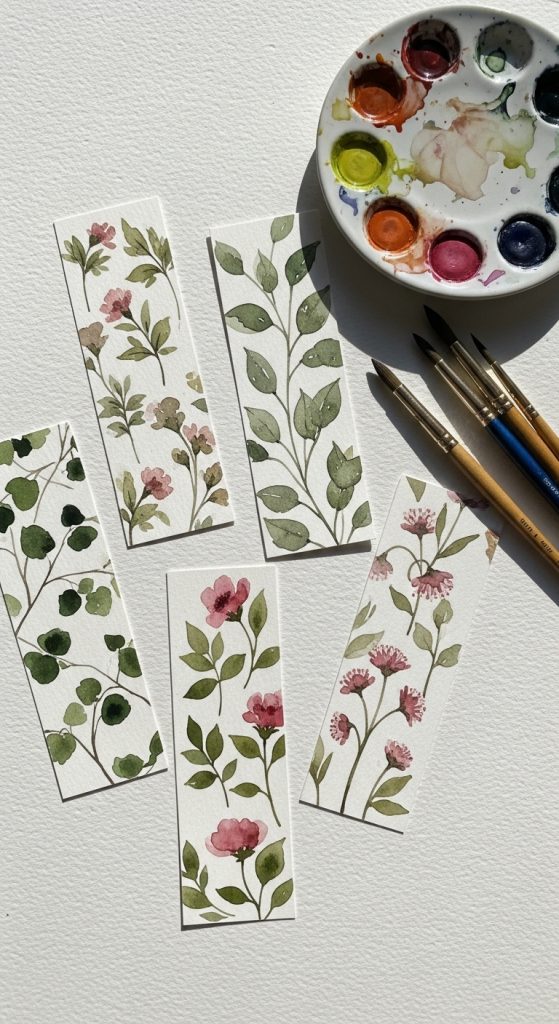
Hand painted bookmarks offer endless creative possibilities and hold personal sentimental value. Natural elements such as floral patterns, leaves, branches, and landscapes can be incorporated to achieve a calm and earthy aesthetic. The materials you need include thick paper or watercolor card, watercolor paints or acrylics, brushes, a hole punch, and ribbon for finishing touches. Preparation begins by cutting the paper into bookmark sized strips. Once cut, lightly sketch your chosen design. Floral themes are among the most popular because they blend well with soft color palettes and organic shapes. Begin painting slowly and allow the colors to blend naturally. Watercolor techniques such as wet on wet or soft gradients create a delicate and artistic look. After painting, allow the bookmarks to dry completely and then punch a small hole at the top. Add a ribbon to complete the design. Hand painted bookmarks can be customized for seasonal themes, study purposes, or gifts. Since bookmarks are used frequently, decorating them with calming natural visuals enhances the reading experience. Every time someone opens a book, the subtle design can evoke a sense of peace and inspiration. These bookmarks also provide an excellent starting point for beginners exploring art based stationery decoration.
Idea 7
Decorated Divider Tabs for Journals and Planners
Divider tabs are crucial for organization, especially in planners and journals. Decorating them enhances both function and appearance. To create aesthetic divider tabs, prepare cardstock paper, scissors, adhesive, markers, and optional printed labels. Begin by cutting cardstock into small rectangles or rounded tab shapes. These tabs can be categorized by theme such as months, priorities, subjects, projects, or personal tasks. Once prepared, start decorating them based on a cohesive aesthetic style. For example, you can create soft gradient backgrounds, minimal line illustrations, pastel borders, or mini collage layers. Using clear lettering is essential since divider tabs must be readable at a quick glance. Hand lettering with brush pens or simple bold writing can make the tabs stand out without disrupting the overall calm aesthetic. After decorating and labeling, attach the tabs to the edges of journal pages using strong adhesive. These tabs make it easier to navigate large planners and provide a satisfying sense of order. Aesthetic divider tabs are especially useful for students, writers, and professionals who rely heavily on organizing multiple categories. They elevate the appearance of a planner while enhancing the efficiency of managing schedules, ideas, and notes.

Idea 8
Washi Tape Decorated Edges and Borders
Washi tape is one of the most versatile tools for stationery decoration. It comes in a wide range of colors, patterns, and themes that can transform plain stationery into visually appealing items. To begin, gather a selection of washi tape rolls, scissors, and the stationery pieces you want to decorate such as notebook pages, envelopes, journal spreads, or study guides. Preparing this project is simple and does not require advanced skills. Choose washi tape patterns that match a specific aesthetic theme such as floral, minimal, grid, watercolor, or vintage. Start by placing the tape along the edges of pages to create borders or accent corners. You can also create small tabs by folding a piece of tape over the edge of the page. Washi tape is repositionable, making it ideal for beginners who want to experiment with layouts before finalizing designs. This decoration method is useful for noting important pages, enhancing the visual appeal of journals, or preparing study notes that feel comfortable to read. The aesthetic effect of washi tape lies in its balance between color variety and gentle patterns. By limiting the design to one or two tape themes, you can maintain a consistent aesthetic throughout the project.

Idea 9
Hand Stamped Stationery Sets
Hand stamped designs allow repeated patterns, customized shapes, and personalized themes. To create a hand stamped stationery set, gather rubber stamps, ink pads, blank cards, envelopes, and plain sheets of paper. If you want a more personalized theme, you can carve simple stamps from erasers using craft knives. Preparation begins by selecting a theme such as botanical patterns, geometric shapes, stars, or lettering. Once ready, lightly test your stamp on scrap paper to ensure even ink distribution. Begin stamping the design onto the stationery with consistent pressure. Patterns can be repeated in rows, scattered randomly, or used as corner accents. Hand stamped stationery sets are ideal for writing letters, creating gift notes, or organizing labels. They convey a personal and handmade charm that store bought stationery often lacks. The aesthetic appeal depends on choosing an appropriate color palette. Neutral ink pads in brown, grey, or muted green create a calming effect, while darker tones emphasize clarity. Hand stamping is a relaxing and creative process suitable for all ages and skill levels. The repeated patterns create harmony and consistency, making the stationery look balanced and thoughtfully designed.

Idea 10
Decorated Storage Boxes for Stationery Organization
Aesthetic stationery is only complete when organized properly. Decorating storage boxes helps maintain cleanliness while adding charm to your workspace. For this project, prepare small cardboard boxes or wooden boxes, adhesive paper, paint, brushes, and optional labels. Start by choosing an aesthetic theme such as minimal white, pastel tones, rustic kraft textures, or patterned designs. If using paint, begin with a base coat and allow it to dry completely before adding additional layers or details. For a cleaner look, adhesive paper in soft colors can be applied directly to the surface. Smooth the paper thoroughly to remove bubbles. Add labels to categorize items such as pens, tapes, stickers, or notebooks. These labels can be hand written or printed depending on preference. Decorated storage boxes provide structure to your desk and reduce clutter. When each stationery item has a designated place, your workspace feels calmer and more efficient. This decoration approach combines beauty with practicality, creating a visually consistent environment that encourages productivity. The overall look of your desk improves substantially when storage solutions match the aesthetic theme of the stationery they hold.

About Me

Chesung Subba
Author/Writer
Hello, I'm Chesung Subba, a passionate writer who loves sharing ideas, stories, and experiences to inspire, inform, and connect with readers through meaningful content.
Follow Me
Connect with me and be part of my social media community.
Leave a Reply