
10 DIY Minimal Home Decor Project
Minimal home decor is all about simplicity, clarity, and purposeful design. It focuses on clean lines, natural textures, and thoughtful use of space. Many people assume that creating a minimal home requires expensive furniture or professional interior help, but the truth is that you can achieve a beautifully simplified space with easy do it yourself projects. Each project in this guide is designed to enhance your home while keeping materials accessible and instructions beginner friendly. The goal is to help you create a calming environment that feels organized, functional, and visually balanced.
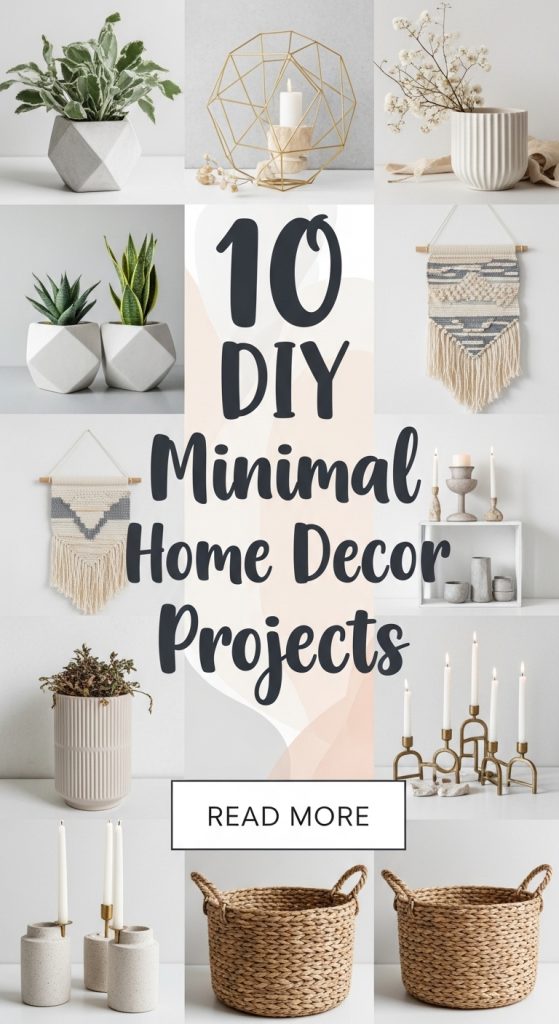
Minimal decor does not eliminate personality. Instead, it reduces unnecessary distractions and highlights only what truly matters. Through the following ten DIY projects, you will discover how small handcrafted additions and smart design decisions can create a cohesive minimal aesthetic. These projects range from wall art and shelving to furniture upgrades and lighting accents. Each point comes with a detailed breakdown of preparation, material requirements, and instructions for completion. If you seek a home filled with clarity and calm, this guide will help you craft decor that feels intentional and modern.
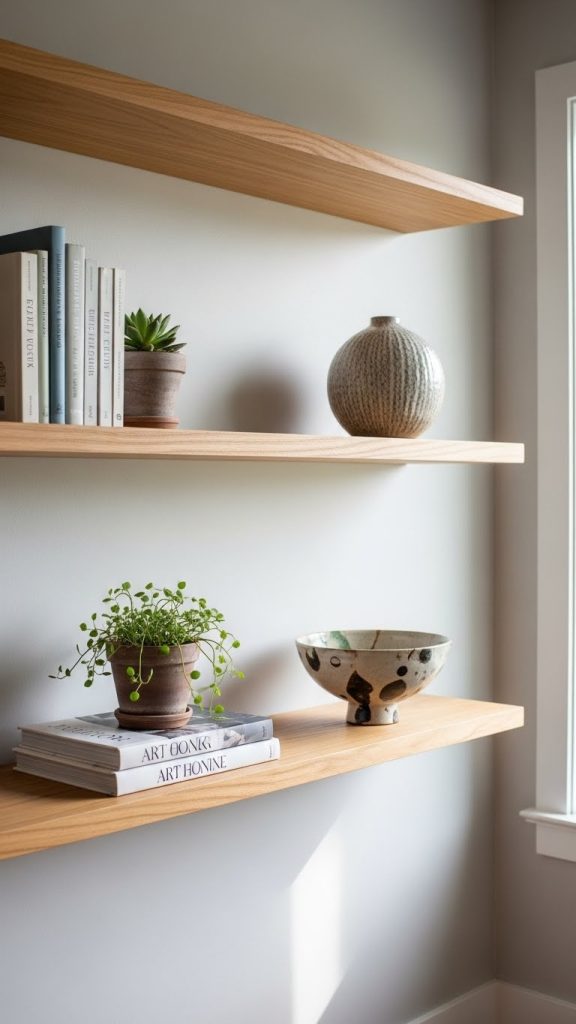
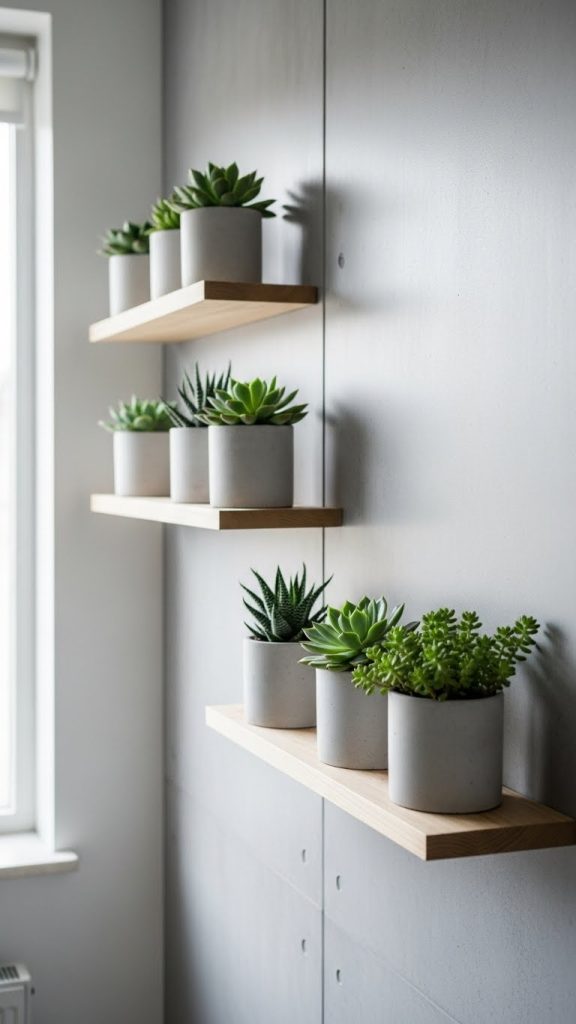
1. DIY Minimal Floating Shelves
Preparation and Materials
To create minimal floating shelves, prepare a clean working area and measure the wall space where the shelves will be installed. Required materials include wooden planks, wall brackets or concealed mounting hardware, sandpaper, wood stain or matte paint, a drill, screws, a level, and a measuring tape. Choose simple straight edged planks with minimal grain for a clean finish. Decide whether you want a natural wood appearance or a painted surface that blends with your wall color.
Explanation
Minimal floating shelves are one of the most effective DIY additions for a clean and modern home. These shelves support the foundations of minimalism by eliminating bulky furniture and visually heavy storage. When installed correctly, the hardware remains hidden, making the shelves feel like they are seamlessly emerging from the wall. This effect helps create an airy and uncluttered look that works in living rooms, kitchens, bedrooms, and even entryways. The true beauty of minimal floating shelves lies in their versatility. You can display a small curated selection of books, a single plant, or neutral ceramic pieces. The goal is not to fill the shelf but to choose items that add purpose and balance. Their clean lines also help your walls look more spacious. This project is simple enough for beginners yet impactful enough to change an entire room. With careful measurement and attention to finishing details, floating shelves enhance the sense of order and intentionality that defines minimal decor. They provide storage without overwhelming the room and allow you to style your home with simplicity and elegance.
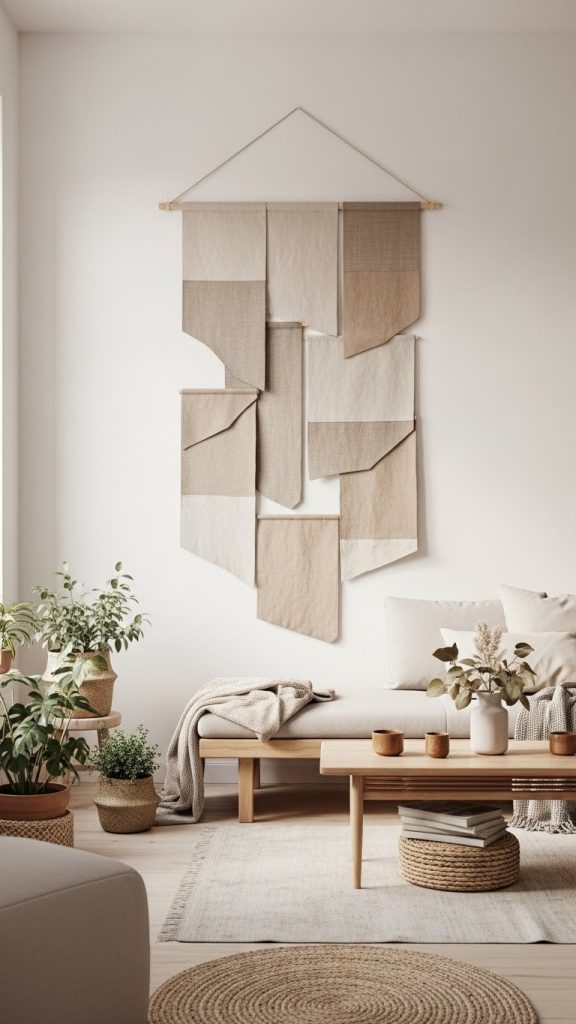
2. DIY Neutral Fabric Wall Hanging
Preparation and Materials
Prepare by selecting a neutral palette consisting of beige, cream, taupe, or soft gray fabrics. Materials include cotton rope, dowel rods, scissors, a glue gun, linen or canvas fabric strips, and a measuring tape. You may also use fabric stiffener if you prefer sharp edges. Clear a large surface to lay out the design before assembly.
Explanation
A neutral fabric wall hanging gently introduces texture into a minimal home without overwhelming the visual landscape. Minimalism benefits from natural fibers, soft colors, and organic movement, which is why linen and cotton fabrics are ideal for this project. The hanging creates depth on a blank wall without requiring complex artwork or bright tones. The beauty of this DIY project lies in its simplicity. You can design geometric layers, straight vertical strips, or asymmetrical shapes that align with your home’s aesthetic. Because the colors remain subdued and consistent, the final result maintains a calm presence. This project also enables personalization since the length, width, and layering can be fully customized. Unlike traditional framed art, a fabric hanging softly moves with airflow, adding a subtle dynamic quality to the room. It introduces warmth while remaining true to the principles of minimalism. Since the materials are inexpensive and easy to assemble, it is an excellent option for renters who need lightweight and nonpermanent decor. Whether hung above a bed, sofa, or hallway console, a neutral wall hanging will elevate the room with clean and understated style.
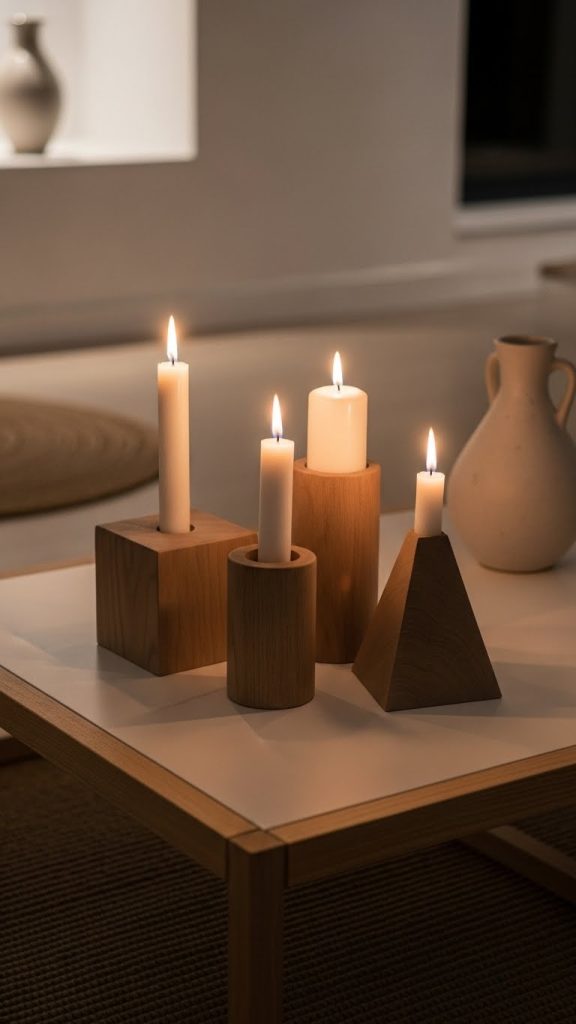
3. DIY Wooden Candle Holders
Preparation and Materials
Prepare a ventilated workspace and gather wooden blocks or dowels, a saw, sandpaper, wood glue, a drill with a spade bit for candle holes, wood finish, and small felt pads for the base. Choose smooth softwood pieces for easy cutting and shaping. Measure the candle size to drill the correct diameter.
Explanation
Wooden candle holders are a perfect expression of minimal design because they combine natural materials with clean geometric forms. Their purpose is not to show ornamentation but to support soft lighting and simple silhouettes. The crafting process involves cutting wooden blocks into uniform or varied heights and drilling holes that hold taper or tea light candles securely. When sanded and finished with a matte coat, the wood appears smooth and modern. Candle holders like these bring understated elegance to dining tables, nightstands, bathroom shelves, or coffee tables. They contribute to a peaceful atmosphere because they highlight the simplicity of raw materials. Using different heights creates a balanced composition without appearing cluttered. The minimal design ensures that the candle holders do not compete for attention but instead complement the surrounding space. They also make thoughtful handmade gifts. This project requires only basic tools and gives you full control over the size and finish. By choosing natural textures and avoiding unnecessary detailing, you align the final product with the essential qualities of minimal home decor.
4. DIY Minimal Concrete Planters
Preparation and Materials
Materials include quick setting concrete mix, water, silicone molds or plastic containers, cooking spray as a mold release, sandpaper, and optional white or gray pigment. Lay out a plastic sheet or drop cloth to protect surfaces. Prepare masks and gloves for safety and ensure airflow in the workspace.
Explanation
Concrete planters have become a popular feature in minimal interior design due to their smooth texture, muted color, and straightforward shape. This DIY project allows you to create small to medium sized planters that work for succulents, herbs, or decorative plants. Concrete naturally produces a modern industrial look, but when finished with fine sanding, it becomes soft and sophisticated. The neutral gray color effortlessly complements minimal interiors. Creating these planters requires mixing concrete to the correct consistency, pouring it into molds, and forming an inner cavity for soil by inserting a smaller container. Once dry, the planter can be refined with light sanding to achieve a clean surface. Concrete planters pair beautifully with green plants, which add life and freshness to a minimal home. The contrast between the natural plant and the cool concrete enhances visual balance. These planters work well on window sills, floating shelves, or as centerpieces. Their durability and timeless appearance ensure they remain relevant even as decor styles evolve. This project is simple, affordable, and ideal for anyone seeking to incorporate natural elements into minimalist design.
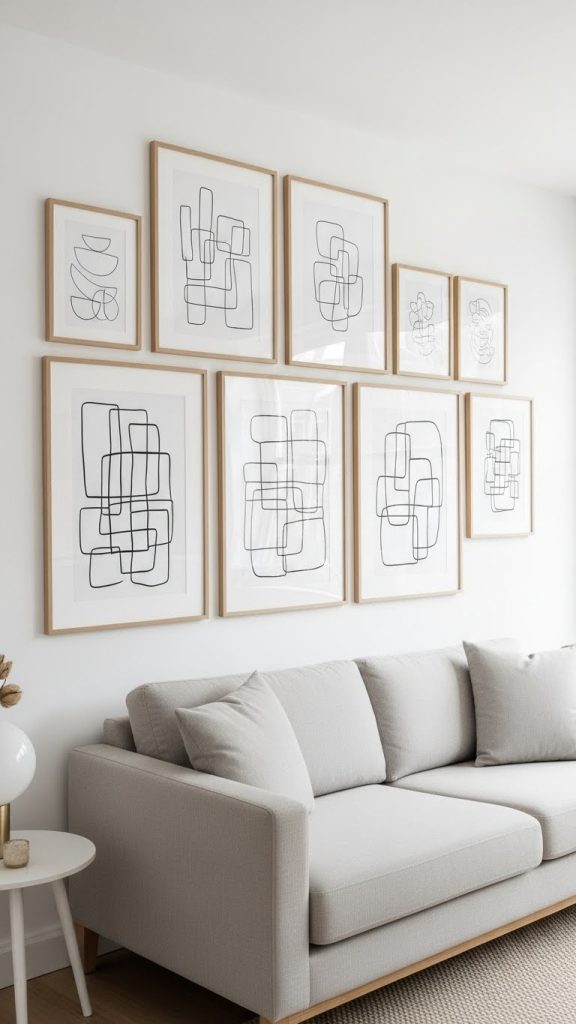
5. DIY Framed Line Art
Preparation and Materials
Prepare crisp white or beige cardstock, black fine liners or ink pens, simple wooden frames, a ruler, and masking tape. Choose minimal frames with slim edges and matte finishes. Clear a flat surface to draw your art and ensure good lighting for precision.
Explanation
Framed line art is a classic element in minimal decor because it focuses on form and movement rather than color or complexity. This project involves drawing clean uninterrupted lines that create abstract shapes, continuous portraits, or geometric forms. The simplicity of line art allows it to blend seamlessly into any room, making it ideal for hallways, bedrooms, living rooms, and offices. The process is relaxing and encourages creativity even for those who do not consider themselves skilled artists. The key is to embrace restraint and avoid excess detailing. Once completed, the artwork is placed in a thin wooden frame that supports the minimalist effect. Hanging two or three frames together creates a cohesive gallery without overwhelming the wall. Line art works beautifully above consoles, sofas, or reading corners. It also provides a low cost alternative to purchasing expensive modern prints. This DIY project helps you personalize your home with artwork that reflects your mood, preferences, and style. By focusing on clarity and simplicity, framed line art becomes a timeless decor piece that enhances the quiet beauty of minimal spaces.
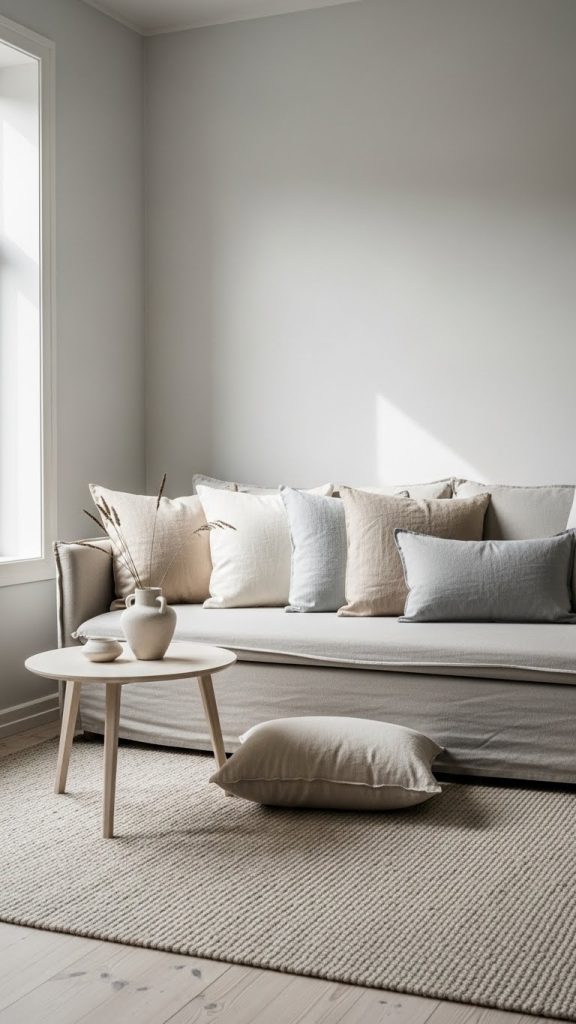
6. DIY Linen Cushion Covers
Preparation and Materials
Materials include linen fabric, thread, a sewing machine or needle, scissors, pins, a zipper or envelope closure kit, and measuring tape. Choose neutral tones like white, beige, stone, or charcoal. Wash and iron the linen fabric before cutting to prevent shrinkage.
Explanation
Linen cushion covers are a staple in minimal interior design because they bring softness and warmth without heavy patterns or bold colors. Making your own cushion covers allows you to control the color palette and size, ensuring a perfect fit for your space. Linen is known for its textural richness and breathable quality, making it ideal for creating a calm and inviting atmosphere. The sewing process is straightforward and suitable even for beginners. You can choose a simple envelope closure or add a concealed zipper for a sleek finish. Neutral colors ensure that the cushions blend with furniture while still adding subtle character. These cushions work beautifully on sofas, beds, benches, or reading nooks. The minimal design avoids clutter while still offering comfort and charm. Handmade covers also provide a custom look that feels intentional and cohesive. This project encourages sustainability because you can reuse inner cushions and replace covers seasonally without buying new ones. The clean lines, neutral tones, and natural fabric align perfectly with the principles of minimal decor, making this DIY a valuable addition to any home.
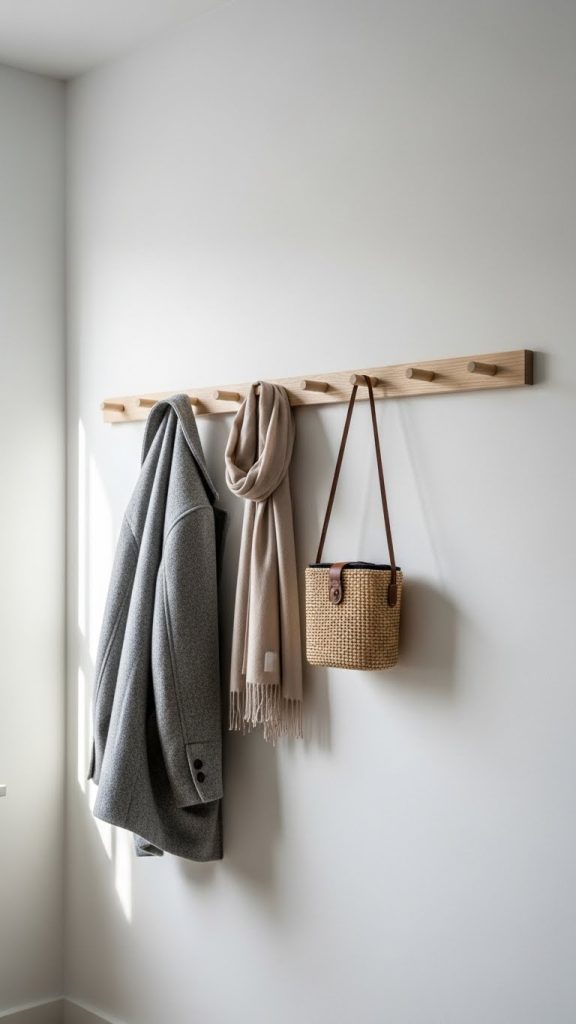
7. DIY Wooden Peg Rail
Preparation and Materials
Gather a long wooden board, wooden dowel pegs, wood glue, screws, a drill, sandpaper, a measuring tape, and matte finish. Choose hardwood for durability. Measure and mark spacing before drilling holes for pegs. Sand all edges for a smooth and safe finish.
Explanation
A wooden peg rail is one of the most functional and aesthetically pleasing additions to a minimal home. It blends storage and decor into one purposeful design element. Peg rails are suitable for entryways, kitchens, bedrooms, or bathrooms. They provide a designated spot for hanging coats, towels, baskets, or accessories, helping reduce clutter and visual noise. The project involves attaching evenly spaced pegs to a wooden board and mounting it securely on the wall. When finished with a matte seal, the natural wood grain remains visible, adding warmth and organic texture to the room. In minimal design, every item should have a clear function, and a peg rail exemplifies this principle. It organizes daily essentials while appearing clean and understated. The ability to hang decorative pieces such as small wreaths, canvas bags, or scarves allows you to change the look of the space without overwhelming it. A peg rail also encourages tidiness, making it ideal for households seeking a streamlined environment. Its simplicity, practicality, and natural appearance make it an essential DIY project for creating a spacious and intentional home.
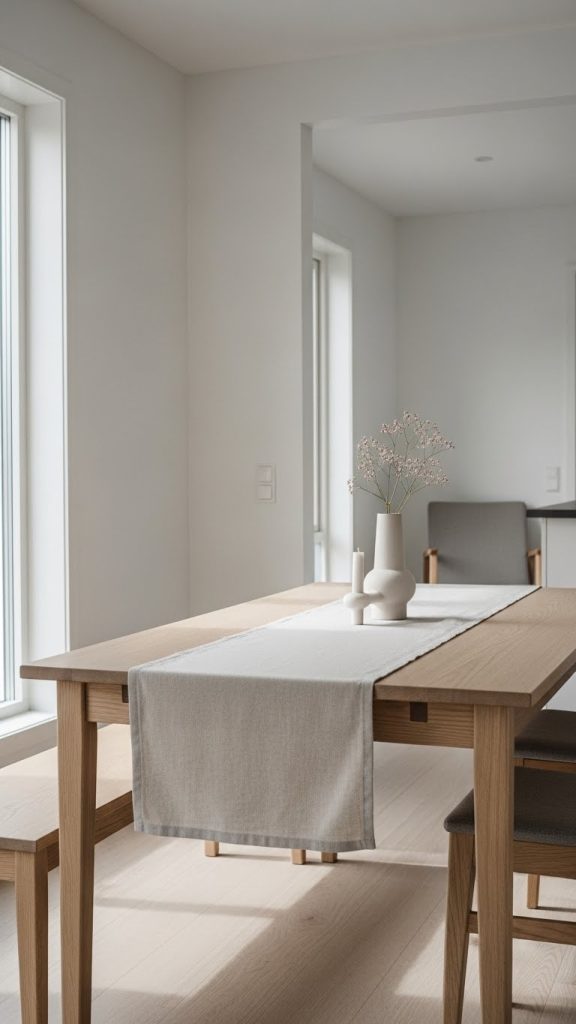
8. DIY Minimal Table Runner
Preparation and Materials
Prepare cotton or linen fabric, fabric scissors, a sewing machine or needle, pins, measuring tape, and an iron. Choose solid neutral colors such as ivory or soft brown. You may also hem the edges for a crisp and clean finish.
Explanation
A minimal table runner transforms the dining area with subtle sophistication. Unlike patterned tablecloths, a solid neutral table runner provides structure and elegance without adding visual weight. This DIY project helps define the dining table while keeping the look refined and uncluttered. Linen and cotton fabrics are excellent choices because they drape naturally and age beautifully. You can cut the runner to fit your table length, allowing it to hang slightly over the edges. Stitching clean hems results in a polished appearance that complements minimal decor. A simple runner enhances wooden tables, especially when paired with a single vase, ceramic bowl, or candle set. It softens the room without overpowering other design elements. Minimalism promotes deliberate selection of decor pieces, and a handmade table runner aligns with this philosophy by adding functional beauty. It also allows seasonal flexibility, since you can create runners in different tones while maintaining a consistent minimal style. This project is easy, affordable, and effective in elevating your dining space into something calm, organized, and visually appealing.
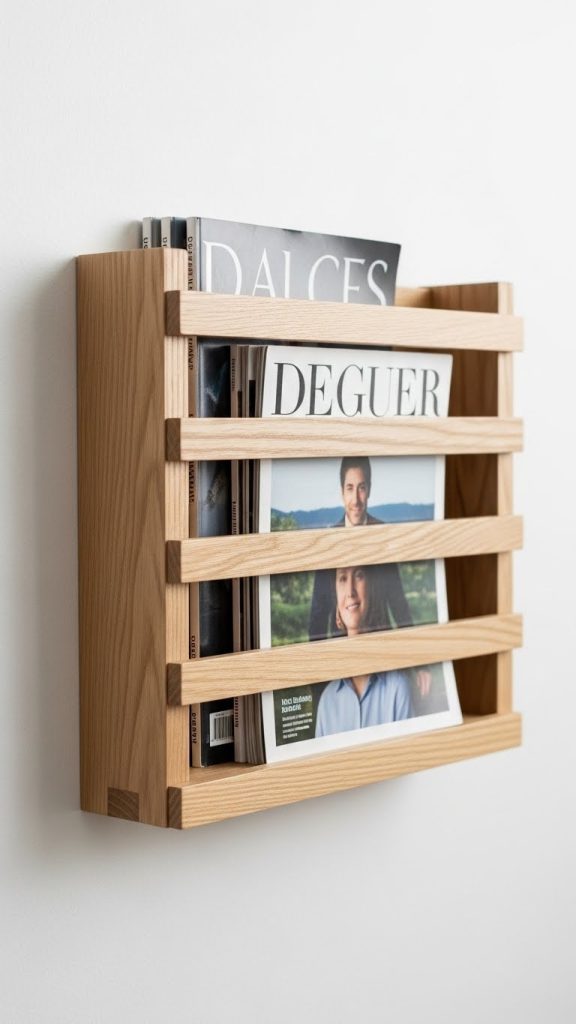
9. DIY Wall Mounted Magazine Rack
Preparation and Materials
Materials include thin wooden boards, wood glue, nails, a hammer, measuring tape, sandpaper, brackets for wall mounting, and optional paint or wood stain. Prepare a flat area for assembly and pre measure the rack dimensions based on available wall space.
Explanation
A wall mounted magazine rack is ideal for maintaining order in a living room, office, or bedroom. It functions as both storage and decor, making it a valuable feature for minimal interiors. Cluttered stacks of books and magazines create visual distraction, but a slim rack organizes them neatly while contributing to the room’s design. This DIY project involves creating a narrow open front shelf that holds reading materials upright. The rack’s thin profile allows it to fit in small spaces such as beside a sofa or beneath a window. When built from smooth wooden planks and sealed with a matte finish, the rack blends seamlessly into the surrounding decor. Its open design keeps the look airy and uncluttered. The goal is not to fill it with many items, but to select a few aesthetically pleasing publications or journals that complement the space. This project supports the minimal principle of reducing unnecessary objects while still offering functional storage. It is simple to construct and adds a touch of intentional design to your home.
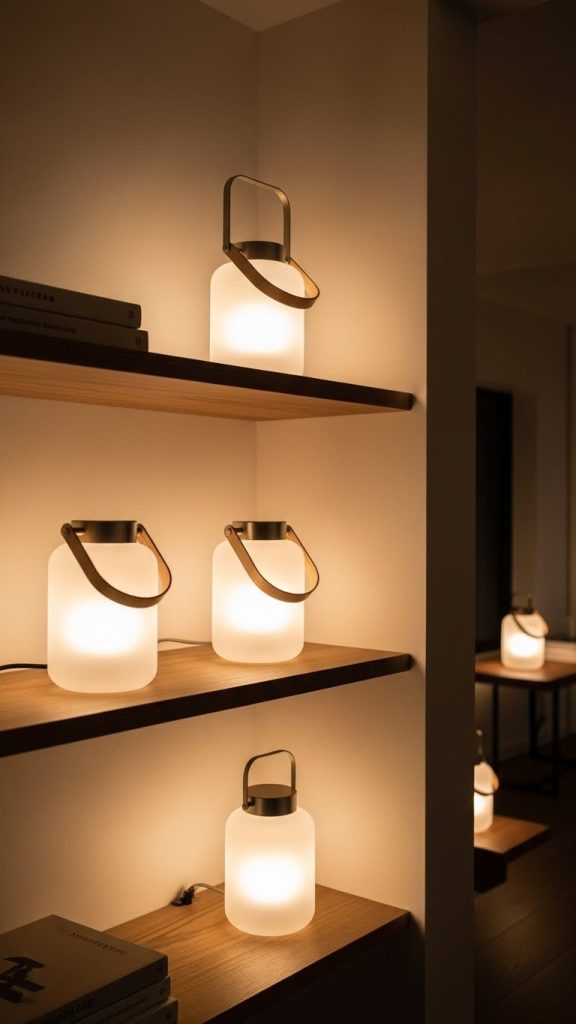
10. DIY Soft Glow Lantern Lamps
Preparation and Materials
Materials include frosted glass jars or cylindrical containers, LED tea lights, thin wooden sticks or metal wire for handles, glue, sandpaper, and optional matte paint. Clean the jars thoroughly before starting to ensure even light diffusion.
Explanation
Soft glow lantern lamps are perfect for adding warmth to a minimal home. These lamps use frosted glass or painted translucent jars to diffuse light gently, creating a calm and peaceful ambiance. The project is simple and does not require electrical wiring. LED tea lights provide safe illumination while preserving the quiet aesthetic of minimal decor. You can enhance the design by adding simple wooden handles or leaving the lanterns unadorned for an ultra clean look. When placed on shelves, bedside tables, or outdoor patios, these lamps introduce soft lighting that contributes to a relaxing environment. The minimal style avoids patterns and focuses on clean surfaces and diffused light. The frosted finish ensures that the glow remains muted and even. This project is ideal for evenings when you want to unwind without harsh lighting. It also works well in meditation corners or reading spaces. Since the design is neutral and understated, the lanterns complement any room without dominating the decor. Their simplicity and calming effect make them a perfect addition to a modern minimal home.
About Me

Chesung Subba
Author/Writer
Hello, I'm Chesung Subba, a passionate writer who loves sharing ideas, stories, and experiences to inspire, inform, and connect with readers through meaningful content.
Follow Me
Connect with me and be part of my social media community.
Leave a Reply